
This guide walks you through the creation and management of an AWS EC2 instance (and supporting resources) using Terraform.
Disclaimer
This example creates AWS resources. To prevent incurring unexpected charges, make sure to destroy all resources once complete.
Prerequisites
- AWS Account where you have access to create the necessary resources.
- Basic knowledge of Terraform. This tutorial won’t go into the language details.
- Install Terraform on the machine where these commands are to be run.
- AWS (session) credentials. Run a simple check. The following should not return an authentication error.
aws s3 ls
- Code editor. If you’re using VSCode (use VSCodium instead), I’d recommend the Terraform plugin.
Anatomy
The most basic publicly accessible EC2 machine has the following seven components.
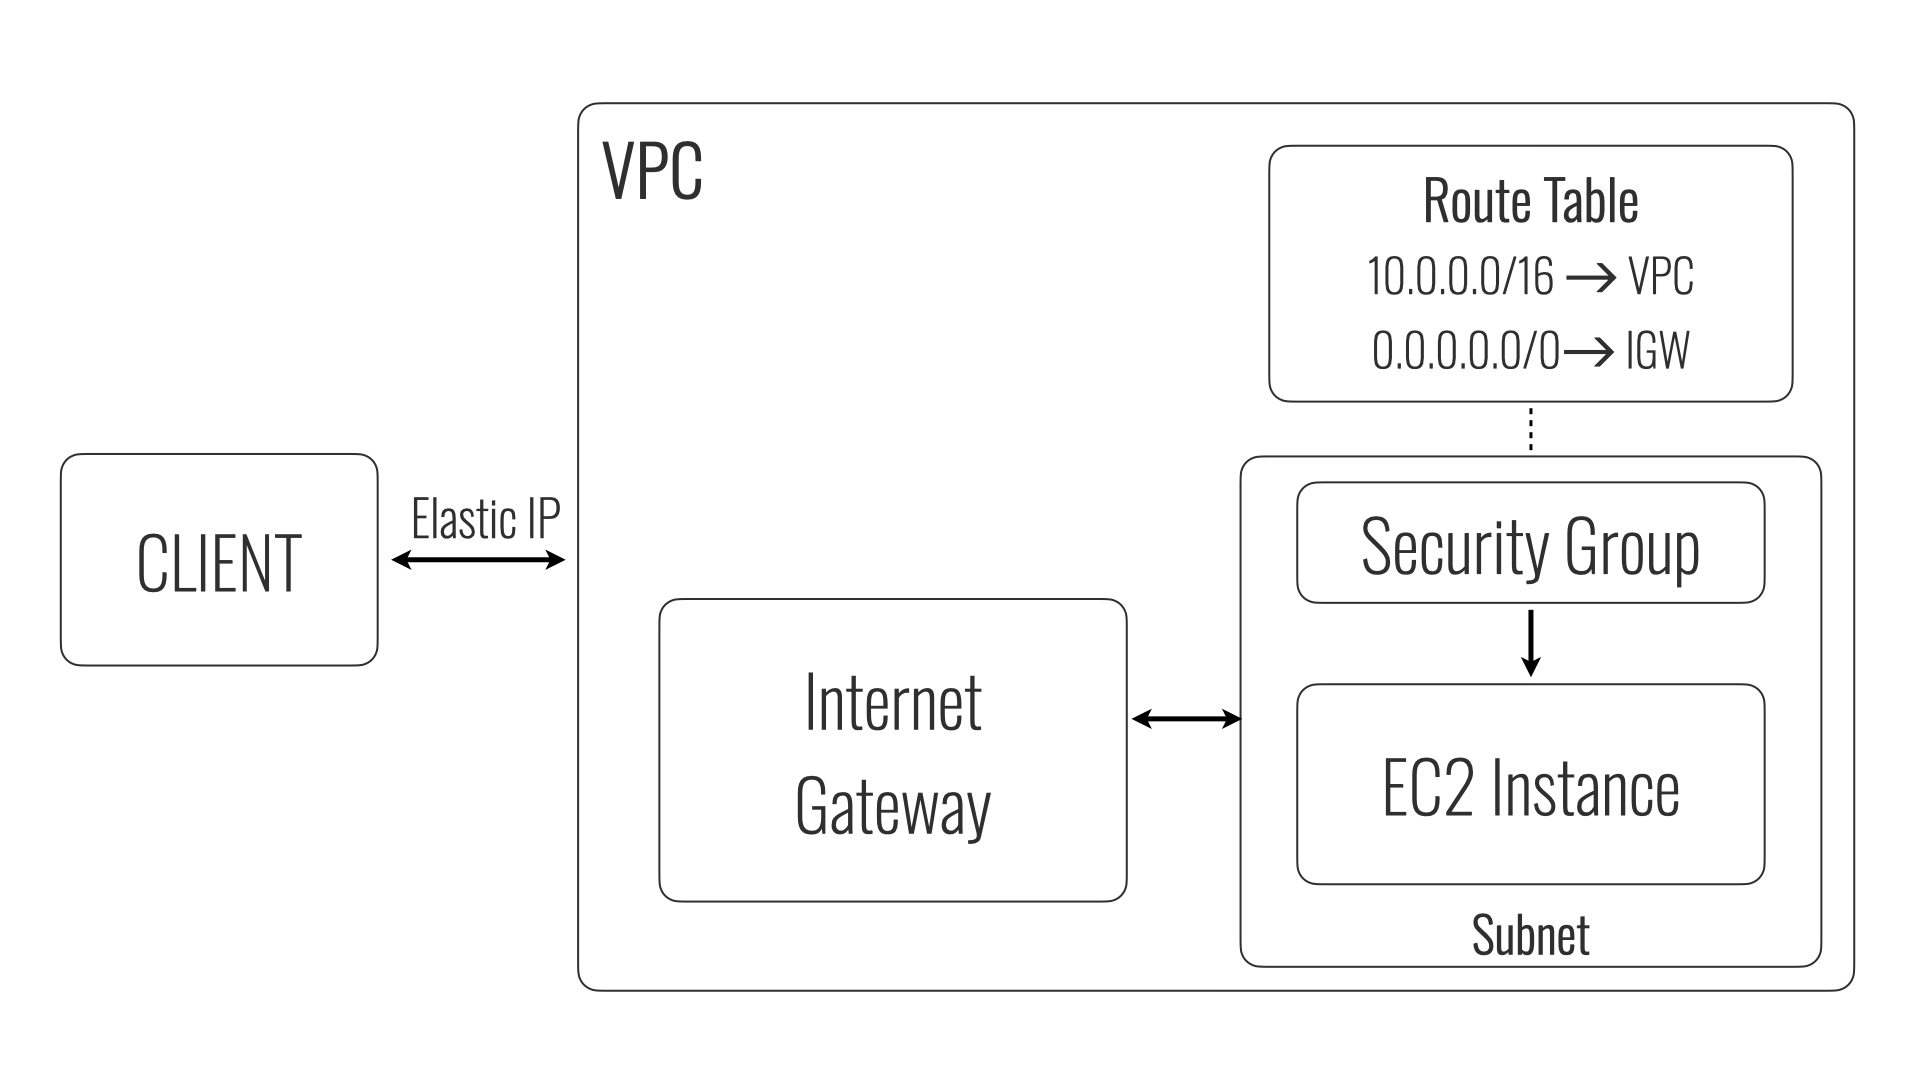
VPC: This is a virtual, private network in the cloud that only we have access to.
- Almost all resources are deployed in a VPC (exceptions like internet gateways).
- If a VPC is not defined, the default one in the region is used.
Subnet: Subnets are divisions of VPCs to separate resources. So you can make some subnets public and expose them to the internet and some can be kept private, for example to deploy databases in.
Internet Gateway: A VPC by default is sealed off from the internet. We need to manually open the VPC to the internet. An Internet Gateway is a service this is installed at the VPC level (not in a subnet) that then allows traffic from the public internet to enter the VPC.
Note: There are also services that allow only outbound access such as NAT gateways, which are not discussed here.
- Route Table: It’s a table that lists routing rules between subnets, and between subnets and internet gateways.
- There’s a default route to allow all traffic to flow between subnets.
- We can add additional rules to connect select subnets to the internet gateway. Those subnets will then be able to accept inbound internet traffic.
Security Group: Since there’s a default route between subnets, in theory services across subnets can find and access each other using the VPC local IP addresses. An AWS Security group is a firewall, which allows us allow or restrict services from accessing each other.
EC2 Instance: The EC2 instance is a virtual machine. AWS offers options to configure the amount of vCPU, Memory, disc space, I/O, architectures and operating systems.
Elastic IP: AWS EC2 machines sometimes have a public IP attached when they are created. But they will get destroyed when the machine gets destroyed. We can purchase a public IP separately and attach/detach that to/from a machine. Such an IP is called an Elastic IP.
Code
I highly recommend keeping Hashicorp registry documentation open to refer to.
Note: In this example, we are not going to backup the state file as this is a test setup. But if you were going to store it in AWS S3 for example, the
provider "aws"block is where the bucket will be configured.
Setup
In the root folder, create a main.tf, variables.tf and a providers.tf file.
Create a ec2-deploy.auto.tfvars.json. This is where the deployment configuration lies. Terraform automatically looks for any *.auto.tfvars and *.auto.tfvars.json files so we don’t need to use the -var-file argument.
Let’s first create a region variable in variables.tf.
variable "region" {
  description = "The AWS Region"
  type        = string
  default     = "eu-west-1"
}
Use this region to setup the provider.
# providers.tf
terraform {
  required_version = ">= 1.12.2"
  required_providers {
    aws = {
      source  = "hashicorp/aws"
      version = "~> 6.0"
    }
  }
}


provider "aws" {
  region = var.aws_region
  # Configuration options
}
It’s a good practice to have name variable in variables.tf and suffix this name to all resources, to easily help identify them.
AWS tags are key-value pairs that are very useful to identify and track resources. Let’s create both.
# variables.tf
variable "name" {
  description = "The name of the deployment"
  type        = string
  default     = "my-website"
}

variable "tags" {
  description = "Additional tags to apply to all resources that support tagging."
  type        = map(string)
  default     = {}
}
For most resources the Name tag is what’s displayed on the Console when you see a list of resources. It’s a good idea to explicitly set this tag. I generally merge these tags as follows.
# main.tf
locals ={
  tags = merge({
    Name = var.name
  }, var.tags)
}
Networking
Let’s first setup the networking connections (VPC, Subnet, Internet Gateway and Route tables).
VPC
Search for VPC in the docs or use this link. This will give you a list of all options.
The most important option is the CIDR block.
CIDR block is a block of IP addresses from which AWS can assign IP address to different network interfaces. At this point, I’d recommend using the default value of 10.0.0.0/16.
This provides 2^16 (65536) possible IP addresses, which is way more than sufficient for most cases. Let’s make the CIDR block configurable using a VPC.
# variables.tf
variable "vpc_cidr_block" {
  description = "The primary IPv4 CIDR block for the VPC."
  type        = string
  default     = "10.0.0.0/16"
}
Now, let’s create a VPC.
# main.tf
resource "aws_vpc" "vpc" {
  cidr_block = var.vpc_cidr_block
  tags       = local.tags
}
Subnet
Search for Subnet in the docs or use this link. This will give you a list of all options.
There are two mandatory options. The VPC ID and once again a CIDR block.
The Subnet CIDR block is a subset of VPC CIDR block, i.e., we are assigning a subset of IP addresses available in the VPC to a subnet. Subnet IP addresses cannot overlap.
We can either manually calculate the IP range or Terraform’s built-in cidrsubnet function.
cidrsubnet(prefix, newbits, netnum)
For example
cidrsubnet(10.0.0.0/16, 8, 0)is effectively10.0.0.0/24.cidrsubnet(10.0.0.0/16, 8, 1)is effectively10.0.1.0/24.
and so on.
# main.tf
resource "aws_subnet" "public" {
  vpc_id     = aws_vpc.vpc.id
  cidr_block = cidrsubnet(var.vpc_cidr_block, 8, 0)

  tags = local.tags
}
Since we are going to make this subnet public, let’s call it that.
Internet Gateway
Search for Internet Gateway in the docs or use this link. This will give you a list of all options.
This is pretty straightforward. We just need to attach it to the correct VPC.
# main.tf
resource "aws_internet_gateway" "gw" {
  vpc_id = aws_vpc.vpc.id

  tags = local.tags
}
Route Table and Routes
Search for Route Table in the docs or use this link. This will give you a list of all options.
We are going to set one public route to route all traffic 0.0.0.0/0 to the internet gateway. There’s a default route between subnets that will be automatically created.
# main.tf
resource "aws_route_table" "public" {
  vpc_id = aws_vpc.vpc.id

  route {
    cidr_block = "0.0.0.0/0"
    gateway_id = aws_internet_gateway.gw.id
  }

  tags = local.tags
}
We also need to tell the Route table that this public route should be forwarded to the public subnet. That’s done using a route table association.
# main.tf
resource "aws_route_table_association" "association" {
  subnet_id      = aws_subnet.public.id
  route_table_id = aws_route_table.public.id
}
Security Group
Search for Security Group in the docs or use this link. This will give you a list of all options.
The security group is the firewall. We can define traffic what IP addresses and what ports to allow into the machine.
For this example, let’s allow full SSH access inbound access (ingress) and full outbound (egress).
Note: Such broad SSH access is insecure. In production either restrict the IP to a list of known IPs or use a service like Wireguard, TailScale or even AWS Session manager. This is a test installation, so we keep it as it is.
The description field is mandatory for Security groups.
# main.tf
resource "aws_security_group" "sg" {

  name        = ${var.name}
  description = "EC2 Instance Security Group"
  vpc_id      = aws_vpc.vpc.id

  ingress {
    from_port   = 22
    to_port     = 22
    protocol    = "tcp"
    cidr_blocks = ["0.0.0.0/0"]
    description = "SSH access"
  }

  egress {
    from_port        = 0
    to_port          = 0
    protocol         = "-1"
    cidr_blocks      = ["0.0.0.0/0"]
    ipv6_cidr_blocks = ["::/0"]
  }

  tags = local.tags
}
EC2 Machine
Search for EC2 Instance in the docs or use this link. This will give you a list of all options.
Here there are a few dozen options. But this example will use only the most important one.
# variables.tf
variable "server_instance_type" {
  description = "The type of instance to start. See https://aws.amazon.com/ec2/instance-types/ for more information."
  type        = string
  default     = "t4g.nano"
}

variable "disk_size" {
  description = "The size of the instance's disk."
  type        = number
  default     = 20
}
For this example, I’ll use t4g.nano instance, which is the smallest burstable instance at the time of writing.
We also need to use an AMI (Amazon Machine Image), whic is an OS image with some customizations; for example to run scripts at the start up. If you have an image you can use the ID.
Here I’m going to use the latest Amazon Linux 2023 image. Instead of searching the AMI ID online and hardcoding this, we can use a Data source to fetch this during deployment.
# Fetch the most recent Amazon Linux 2023 (AL2023) AMI.
data "aws_ami" "amazon_linux_2023" {
  most_recent = true

  filter {
    name   = "name"
    values = ["al2023-ami-2023*-arm64"]
  }

  owners = ["137112412989"] # Amazon
}
We can now create the instance by referring to this.
# main.tf
resource "aws_instance" "ec2_instance" {
  ami                    = data.aws_ami.amazon_linux_2023.id
  instance_type          = var.server_instance_type
  subnet_id              = aws_subnet.public.id
  vpc_security_group_ids = [aws_security_group.sg.id]

  root_block_device {
    volume_size = var.disk_size
    encrypted   = true
  }

  credit_specification {
    cpu_credits = "standard"
  }


  lifecycle {
    ignore_changes = [
      ami # The "current" latest version of the AMI may not be the one that was used during deployment.
    ]
  }

  tags = local.tags

}
Two things to note:
- The credit specification is only for burstable instances.
- The data block will return the latest image all the time. So if it fetches an image that is newer than what you installed, it might force your machine to be redeployed. The
ignore_changesblock prevents this by ignoring changes to AMI ids.
Elastic IP
Search for Elastic IP in the docs or use this link. This will give you a list of all options.
# main.tf
resource "aws_eip" "public_ip_address" {
  depends_on = [aws_instance.ec2_instance]
  tags       = local.tags
}
Associate this with the machine.
# main.tf
resource "aws_eip_association" "eip_assoc" {
  instance_id   = aws_instance.ec2_instance.id
  allocation_id = aws_eip.public_ip_address.id
}
Review/Summary
Check the code in the Github repo to compare it with yours.
Deployment
First initialize the Terraform state.
$ terraform init
Create the project specific values in ec2-deploy.auto.tfvars.json. The other variables are left default, but you can set it.
{
  "name": "tf-test",
  "tags": {
    "env": "dev",
    "purpose": "learning",
    "maintainer": "krishna"
  }
}
Plan the deployment.
$ terraform plan
If there are no errors, execute the plan.
$ terraform apply
Checking
Head over to the AWS console to your region and check that the resources, along with the proper tags are created.
You can now SSH using AWS Instance Connect and run a few commands on your machine.
Destroy
AWS resources like EC2 instances can incur charges if you don’t have an AWS free tier. So let’s destroy that.
If we were setting up these resources manually, we’d need to carefully delete them in the reverse order of creating them and them, paying careful attention to dependencies.
But with Terraform, this can be done in a single command.
$ terraform destroy
Summary
In this post, we discussed the anatomy of a simple EC2 instance setup. We looked at how we can declare these using Terraform code. We deployed that code, tested it and then deleted the entire setup in one simple step.